Our Blog
A Comprehensive Guide to Stone Wall Installation Methods
A Comprehensive Guide to Stone Wall Installation Methods
Introduction
Stone has long been a symbol of luxury and elegance in construction and interior design. This guide explores the main methods of marble wall installation, detailing their processes, advantages, and limitations to help you make an informed decision.
1. Wet Fix Installation

Process Overview

Wet fix installation involves leveling the surface with a plaster layer and using cement mortar or adhesive to fix the marble onto the plaster. This method is commonly used for indoor installations, suitable for walls up to 3.5 meters in height or for lighter, thinner marble tiles.
Installation Steps

1.Preparation
2.Base surface treatment
3.Marble inspection and layout
4.Preparation of adhesive
5.Application of adhesive on the wall
6.Application of adhesive on the back of the marble
7.Marble installation
8.Joint filling
9.Cleaning and maintenance
Key Considerations
Ensure the wall base is properly inspected and treated to meet the required moisture content, flatness, and cleanliness standards.
Proper mixing of adhesive is crucial, and marble tiles should be gently tapped with a rubber mallet and leveled during installation.
Keep the marble back dry and avoid immediate joint filling post-installation.
Advantages
Requires less skilled labor and is relatively simple to perform.
Short construction period and low cost.
Thin finish, saving space with a total thickness of 40mm-50mm.
Disadvantages
Higher risk of stone detachment, cracking, and efflorescence.
More stringent requirements for the base surface.
2. Wet Hanging Installation

Process Overview

Wet hanging involves attaching the marble with metal wires or brackets and then filling the gaps with cement mortar. This method is often seen in textbooks or standards and is typically used for exterior walls, rarely applied indoors.
Installation Steps

1.Preparation
2.Drilling and cutting marble
3.Securing with copper or galvanized wire
4.Tying and fixing the steel mesh
5.Marking and positioning
6.Marble installation
7.Layered grouting
8.Joint filling
9.Cleaning and maintenance
Key Considerations
Use ∅3mm copper hooks or ∅1mm copper wires for wall connection.
Avoid contamination from cement mortar, especially for rough-surfaced marble.
Maintain cleanliness on the construction site to prevent staining.
Advantages
High safety and stability due to mechanical support.
Suitable for heavier and larger marble panels.
Disadvantages
Slower construction due to multiple grouting layers and longer curing times.
Higher costs due to the use of additional materials and labor.
Risk of voids in grouting and efflorescence.
3. Dry Adhesive Installation

Process Overview
Dry adhesive installation, particularly the non-framework method, involves treating the base surface, drilling holes at the corners of each marble tile, filling them with structural adhesive, and inserting a bolt-steel plate structure into the holes.
Installation Steps

1.Preparation
2.Marking and positioning
3.Drilling and adhesive filling
4.Inserting bolt-steel plate structure
5.Marble slotting and cleaning
6.Application of special adhesive
7.Marble installation
8.Joint filling
9.Cleaning and maintenance
Key Considerations
Thorough cleaning is crucial for quality, as improper cleaning can lead to detachment.
Use special dry adhesive for marble attachment; marble glue is only for temporary fixing.
Advantages
Simplified, noise-free, and dust-free construction.
Wide applicability, especially for special areas.
No welding or fire hazards.
Disadvantages
Less strong and earthquake-resistant compared to dry hanging.
Higher cost due to specialized materials.
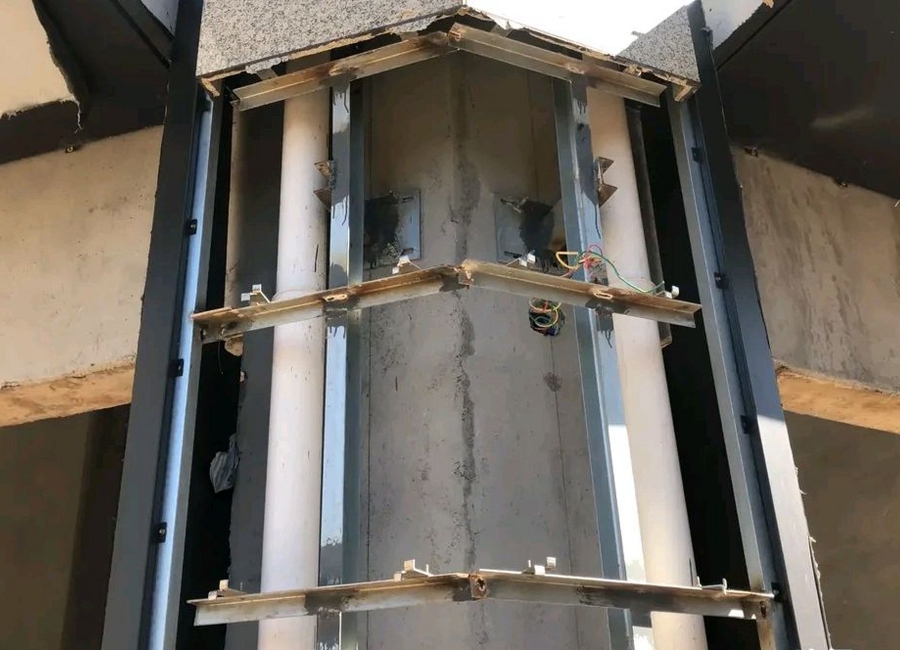
4. Dry Hanging Installation

Process Overview

Dry hanging involves creating a structural connection between the base and the steel frame, then fixing the marble with hanging brackets. This method is ideal for larger and heavier marble panels or for walls higher than 3.5 meters.
Installation Steps

1.Preparation
2.Marking and positioning
3.Installing embedded plates
4.Installing the light steel frame
5.Fixing hanging brackets
6.Marble slotting and installation
7.Joint filling
8.Cleaning and maintenance
Key Considerations
For large marble panels, ensure adequate hanging points to prevent detachment.
Secure steel frame and hanging brackets with proper fasteners to ensure stability.
Use chemical bolts for wall heights exceeding 6 meters.
Advantages
High safety due to physical rather than chemical attachment.
Good earthquake resistance and no efflorescence.
Durable steel frame structure.
Disadvantages
High cost and labor-intensive.
Requires significant space for the steel frame.
Risk of cracking under vertical force due to hollow structure behind marble.
5. Semi-Hanging Installation

Process Overview

Semi-hanging involves installing horizontal steel beams on the wall base, connecting them with expansion bolts, and fixing the marble with hanging brackets. It can be seen as a simplified dry hanging method with only horizontal support.
Installation Steps

2.Marking and positioning
3.Installing horizontal steel beams
4.Fixing hanging brackets
5.Marble slotting and installation
6.Joint filling
7.Cleaning and maintenance
Key Considerations
Suitable for concrete or brick walls that can support expansion bolts.
Not recommended for walls taller than 4 meters.
Advantages
Lower cost due to fewer materials and simpler construction.Less wall thickness required post-installation.
Disadvantages
Limited to specific wall types; not suitable for lightweight or framework walls.
6. Point Hanging Installation

Process Overview

Point hanging uses discrete brackets fixed to the wall with expansion bolts, with the marble slotted and attached to these brackets. This method is typically used for lower interior walls.
Installation Steps
1.Preparation
2.Marking and positioning
3.Fixing hanging brackets
4.Marble slotting and installation
5.Joint filling
6.Cleaning and maintenance
Key Considerations
Ensure adequate curing time for adhesives to prevent early failure.
Clean marble surfaces only after adhesive has fully cured.
Advantages
Minimal wall thickness and fewer materials required.
Lower cost compared to full-frame methods.
Disadvantages
Limited to specific wall types; not suitable for lightweight or framework walls.
Conclusion
Each marble installation method offers distinct advantages and potential drawbacks, making it essential to choose the right approach for your project. Our expertise ensures high-quality, tailored solutions for every need. Contact us to discuss your requirements and discover how we can enhance your spaces with our superior marble installation services.
-
Top Staircase Manufacturers Crafting Stunning Spiral and Traditional Designs
-
2024 Design Trends: DougBuild’s Stunning Peach-Colored Marble
-
Exterior Wall Decorative Stone Options for Enhancing Aesthetic Appeal and Durability

-
Excellence in Stone: Dougbuild Materials’ Vision for 2024
-
Redefine Elegance with Marble Flooring and Waterjet Inlay Designs

-
Enhance Your Exterior with Moca Cream Limestone Wall Cladding
-
A Comprehensive Guide to Stone Wall Installation Methods
-
Understanding and Preventing Yellowing of White Marble
-
Explore 11 Types of Marble for Your Bathroom
-
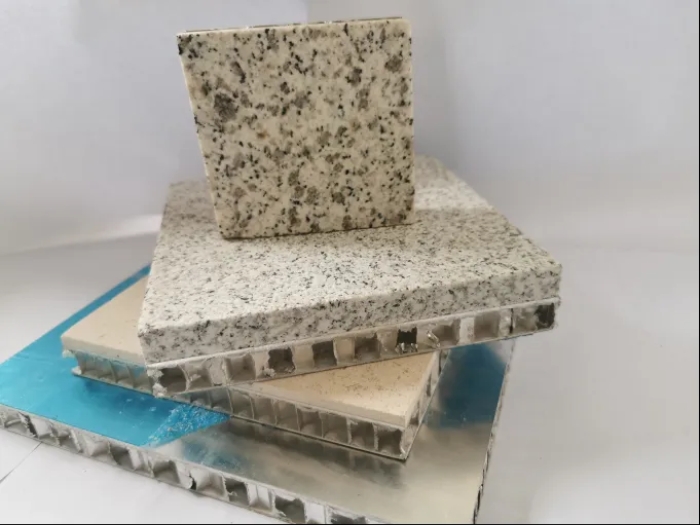
The Role of Stone Aluminum Honeycomb Composite Panels in Modern Construction